Remote Access MindMap
Download FREE Audio Files of all the MindMaps
and a FREE Printable PDF of all the MindMaps
Your information will remain 100% private. Unsubscribe with 1 click.
Transcript
Introduction
Hey, I’m Rob Witcher from Destination Certification, and I’m here to help YOU pass the CISSP exam. We are going to go through a review of the major topics related to remote access in Domain 4, to understand how they interrelate, and to guide your studies.
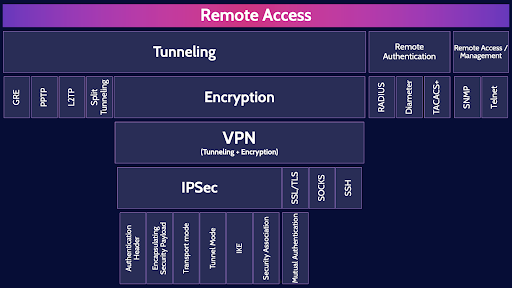
This is the final fourth of four videos for domain 4. I have included links to the other MindMap videos in the description below. These MindMaps are one part of our complete CISSP MasterClass.
Remote Access
The battle continues between corporations and real-estate companies trying to drag folks back into the office and most people wanting to continue working from home so they can have better work life balance
and not waste a significant part of their lives in cursed traffic jams.
Thankfully we have many excellent protocols and systems that allow us to securely connect to remote corporate networks and….
remain highly productive working from home!
We are going to go through the major protocols that allow us to establish tunnels, encrypt those tunnels to create VPNs, perform remote authentication and remote management of systems.
Tunneling
Let’s start with the concept of tunneling, which is encapsulating an entire packet within the data portion of another packet.
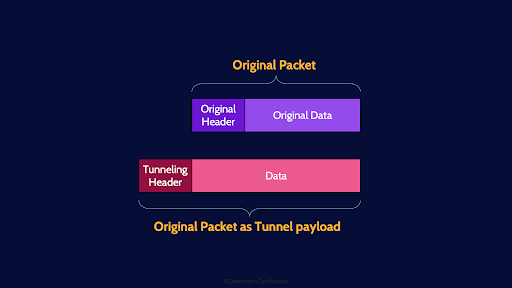
Tunneling allows us to do some very useful things, such as connecting private networks together across a public network like the internet. Recall, the IP addresses we tend to use on private networks, for example 10.0 IP addresses, are not routable across the public internet. Thus, with tunneling we can take a packet that has a private IP destination address and encapsulate that packet within another packet that has a public IP destination address. Tunneling basically means adding a new header to a packet.
We can also encapsulate foreign protocols to run over a network that does not support that particular protocol – for example sending IPv6 packets across and IPv4 network.
GRE
There are three major tunneling protocols you should know about and we’ll start with GRE - Generic Routing Encapsulation which is a simple tunneling protocol that can encapsulate a wide variety of network protocols and create point-to-point connections. Essentially allowing you to easily connect two networks together and pass traffic back and forth between those networks across a third network – typically the internet.
PPTP
PPTP - Point-to-Point Tunneling Protocol - is an obsolete tunneling protocol with many well-known security vulnerabilities. PPTP, by itself, does not provide encryption and authentication and must be used in combination with other protocols to create VPNs – more on what a VPN is in just a moment.
L2TP
L2TP – Layer 2 tunneling Protocol - is a successor to PPTP and L2TP includes many improvements such as the ability to encrypt its control messages, but very importantly, L2TP, on its own, does not encrypt the data portion of a packet.
Split tunneling
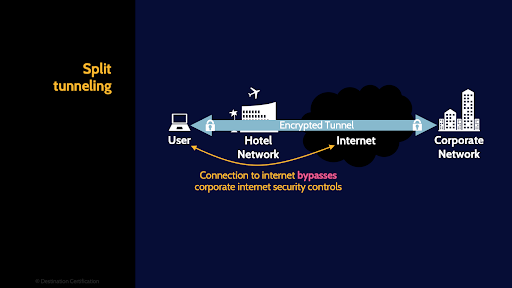
Split tunneling is where some traffic will be sent through the secure encrypted tunnel, often to a corporate network, while other traffic will not be sent through the tunnel but will instead go straight out onto the internet. This is sometimes done for performance reasons: by not sending traffic first through the tunnel and then onto the internet, but rather straight to the internet - it can speed things up. The security concern with split tunneling is that the traffic that goes straight out onto the internet bypasses the corporate security controls.
Encryption
Now an extremely important topic to layer on tunneling: Encryption. Why is it so important to encrypt the data portion of a packet when sending that data through a tunnel? As we’ve discussed, tunnels are typically used to connect two private networks together over the public internet or to connect a remote device, like a laptop, to a corporate network, again across the public internet. And you should always assume that someone, probably multiple someone's, are inspecting your data that transits the internet. Therefore, from a security perspective it is very important to encrypt the data that is being sent through a tunnel to provide confidentiality.
VPN (Tunneling + Encryption)
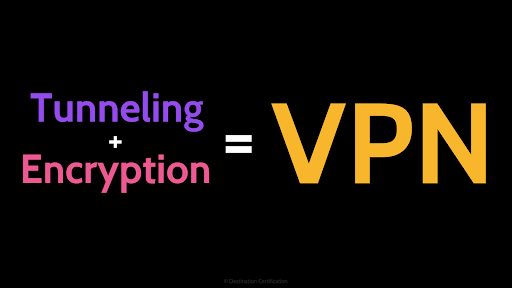
And that is a VPN – a Virtual Private Network is an encrypted tunnel where the data that is sent through the tunnel is encrypted.
Let’s now talk through the major VPN protocols that you need to know about.
IPSec
And we’ll start with the protocol that you need to know the most about: IPSec. IP Security, is a standardized suite of protocols which work together, and allow a massive degree of flexibility in how IPSec can be configured to create a VPN.
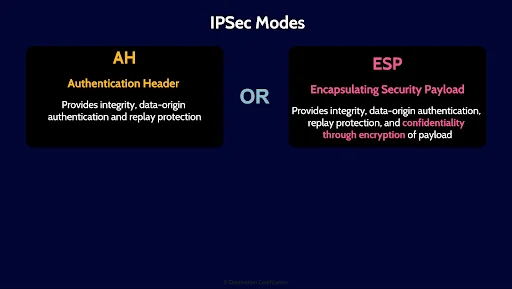
The first choice you have when establishing an IPSec connection is choosing either Authentication Header mode which provides only integrity, data-origin authentication and replay protection OR Encapsulating Security Payload which provides everything in AH plus confidentiality by encrypting the data portion of the payload. So technically, IPSec in AH mode is just a tunnel, while IPSec in ESP mode is a VPN because it provides an encrypted tunnel.
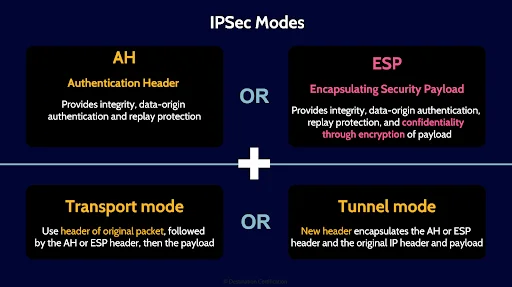
The next choice you have is to run IPSec in either Transport mode, which means the original packet header is re-used, OR Tunnel mode which means a new header is created encapsulating the original packet header and payload.
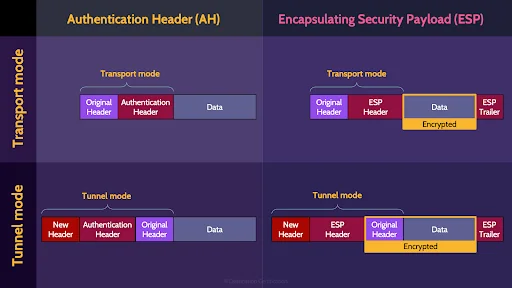
Here’s a 2 by 2 matrix showing you a simplified view of how these different modes fit together.
Hopefully this makes these different modes a little easier to understand.
IKE
Another part of IPSec is IKE – Internet Key Exchange, which is the protocol used to establish Security Associations.
Security Association
What are Security Associations I hear you asking: they are a simplex establishment of attributes such as authentication algorithm, encryption algorithm, and encryption keys to be used when establishing a connection.
Think of it this way, when an IPSec connection is established a bunch of negotiations and agreements need to occur: the client and the server (or more generalized two entities) need to authenticate each other using say X.509 digital certificates and exchange symmetric encryption keys using the say the Diffie Helman key exchange protocol. To allow these two entities to do all this, they first need to agree on what authentication algorithm they are going to use, and what encryption algorithm, and what IPSec mode.
This is the purpose of Security Associations, to agree on and establish these attributes.
And that word simplex means that SAs only allow communication in one direction. So, to establish a tunnel where two entities can talk back and forth you need 2 Security Associations. One for each direction. And if you want to add encryption in both directions you need 2 more SAs. A total of four Security Associations are required to establish an IPSec VPN.
SSL/TLS
Next up, another protocol commonly used for establishing VPNs: SSL/TLS.
Let’s start with naming and versions. SSL - Secure Sockets Layer, was the name of the protocol for the first three major versions, the protocol was then renamed Transport Layer Security (TLS) to better reflect that it operates at Layer 4 – the transport layer of the OSI model. So SSL/TLS are the same protocol and TLS is just the name of the most recent versions.
TLS was primarily created to authenticate and encrypt the connection between a web browser and a web server, but it can also be used to secure other types of connections and allow you to create, say , a VPN.
It’s important to understand the steps that are required to establish a TLS connection.
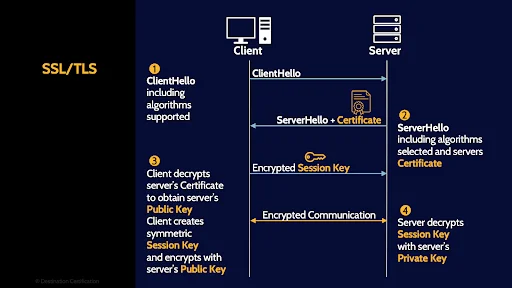
First, the client sends a client hello message, which tells the server which version of TLS the client supports and which encryption algorithms.
Second, The server then responds with a server hello message and very importantly, the server hello message includes a copy of the server’s digital certificate.
Step 3, the client decrypts the server’s digital certificate, allowing the client to authenticate the server – confirm that the server is in fact say Amazon.com and not sketchyhacker.com. As part of step 3 the client generates a new symmetric encryption key, also known as a session key, and encrypts this symmetric key with the server’s public key – obtained from the server‘s digital certificate.
Step 4, the client sends the encrypted session key over to the server and the server decrypts with the server’s private key. And now that both the client and the server have the same symmetric session key, they can efficiently encrypt any data that they send back and forth – thus creating a secure encrypted connection.
I created a video, which I’ve linked to above, on digital certificates where I talk in a little more detail about how they are used in the TLS protocol.
Mutual Authentication
One final piece I’ll mention here related to TLS is that in the initial client hello message, the client can send the client’s certificate to the server, allowing the server to authenticate the client – thus allowing mutual authentication – the client and server can both authenticate each other.
And in fact, you can even run SSL/TLS in a mode referred to as unencrypted SSL, where an encrypted connection is not required, but authentication is required.
SOCKS
A couple of other protocols you should recognize as VPN protocols: SOCKS – Socket Secure protocol which operates and layer 5, the session layer.
SSH
And SSH, Secure Shell protocol which operates at layer 7, the application layer.
Remote Authentication
Next up: Remote Authentication. Let’s say it’s 1995 and you are running a hella fly dial-up internet service with a few thousand customers. You need some way to Authenticate your users, Authorize them, and Account for their usage of your service.
RADIUS
Enter RADIUS, a protocol originally designed to do just that. Remote Authentication Dial-In User Service – is a protocol that allows a user to connect to and access network resources and the protocol provides Authentication, Authorization, and Accounting – Triple A.
TACACS+
TACACS+ - Terminal Access Controller Access Control System Plus – does the same job as RADIUS with the improvement that TACACS+ encrypts the full contents of the packets it transmits vs. RADIUS which just poorly obfuscates the user’s password.
Diameter
And Diameter is the successor to RADIUS. Diameter adds some good security features such as EAP – Extensible Authentication Protocol – for much more secure and robust authentication of users.
Remote Access / Management
Final topic: Remote Access Management. Networks have grown ever larger over the years with network devices like firewalls, routers, switches, and servers spreading all over a building, across multiple buildings or even across multiple countries. We need protocols to allow us to remotely connect to these network devices and administer them - check in on the status of the device and make configuration changes.
SNMP
Enter SNMP - Simple Network Management Protocol which allows you to collect all sorts of information from network devices in real time including performance metrics, alerts, and the specific configuration of a device and well beyond just monitoring you can further send commands to reconfigure a network device. SNMP is a powerful protocol.
I like to remember SNMP as standing for Security’s Not My Problem as the first couple of versions of SNMP are a total dumpster fire from a security perspective. SNMP Version 1 sends passwords in clear text. Version 2 is a slight improvement as it allows password hashing but not by default. Version 3 is a huge improvement from a security perspective, so if you are using SNMP make sure it is version 3.
Telnet
And finally, Telnet, which is a protocol that allows you to remotely connect to a network device like a server and get command-line interface access.

And that is an overview of Remote Access within Domain 4, covering the most critical concepts you need to know for the exam.
Hey a cool feature of our FREE CISSP app, is that it includes an immense glossary of terms you need to know for the exam, and a giant list of acronyms you might see on the exam as well.
Links to download our free app are in the description below.

If you found this video helpful you can hit the thumbs up button and if you want to be notified when we release additional videos in this MindMap series, then please subscribe and hit the bell icon to get notifications.
I will provide links to the other MindMap videos in the description below.
Thanks very much for watching! And all the best in your studies!
